Damped Driven Oscillator (NEW)
Set up:
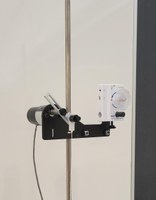
Fill large beaker with water up to the indicated level (approximately 3 inches from the top). Ensure 12V DC motor and pulley are securely tighened to the retort stand. Position the stand next to the beaker such that the string from the motor and pulley is directly over the top of the beaker. Attach spring to the end of the string and attach the other end of the spring to the mass. Gently place mass and spring into the beaker. Having a long pair of tongs is helpful incase the mass falls off the spring. Ensure power supply is turned off and all adjustment knobs are turned entirely counter clockwise. Connect red lead of DC motor to the 20V port of the power supply and the black lead to the COM port on the supply. Select the middle display button for viewing the 20V output.
Operation:
Do not operate above 12V. Turn on the power supply. Slowly adjust the 20V knob increasing the voltage until the motor begins to turn and the mass begins to bob up and down. Continue increasing voltage until resonance is achieved in system and the amplitude of the oscillations increase significantly (the mass may begin to splash out of the water!) Increase driving frequency further still by increasing the voltage. A decrease in amplitude of oscillations should be observed. Do not operate above 12V. Slowly decrease voltage until meter reads 0V. Turn power supply off.
Take Down:
Ensure power supply has been turned off. Remove spring and mass from water and place on paper towel or cloth - this will help avoid corrosion of the mass and/or spring.
Safety considerations:
Do not operate the motor above 12V or risk burning the motor. The beaker filled with water can be somewhat heavy, awkward to transport, and may be slippery. To avoid these issues, align equipment first and then fill beaker with water from a small pitcher/container. Scoop water out of beaker using the same container until the beaker is light enough to move.
Troubleshooting:
- The mass/spring/string is rubbing against the beaker - adjust beaker positioning to ensure the mass and spring are centered in the beaker. You may want to adjust the height of the motor and pulley.
- The motor is not turning on - this can happen for many reasons. Check to ensure all cables are connected correctly to the DC supply (use COM and not ground!) Is your power supply plugged into an outlet? Does that outlet work? Is the pulley or lever on the motor stuck? Did you select a load to large for the motor? These are all questions that can be addressed, but can only (easily) be addressed before the lecture begins. Troubleshooting during a lecture is difficult.
- The lever continues to slide above the pivot - the locking screw must be tightened to ensure the fulcrum cannot slide.
- I cannot achieve resonance - perhaps the natural frequency of the system is beyond that of what can be provided by the motor. This is unlikely though, since you would need to select a very stiff spring and/or a very light mass. If this is the case - change you spring/mass. Continue to make small adjustments to the voltage until a resonance is found. For the large spring and brass mass typically provided, this occurs around 6.2-6.5V.
- There are large sideways oscillations - try clamping the retort stand to the table.
Other considerations:
- Bring a pair of tongs to retrieve a fallen mass and spring.
- Some paper towel or a cloth will aid in the clean up of the demo.
- A camera could be useful in large lecture halls.
- Other fluids, such as glycerin, could be used to dampen the oscillations. If you would like to use a different fluid please reach out to the PLRS team in advance to ensure we can meet this request.
- The pulley shown in the video is a PASCO wireless rotary motion sensor. While it works great as a low friction pulley, it can be connected to PASCO's sparkvue and capstone software (you don't need a DAQ box to use with capstone). The sensor can show the angular displacement, angular velocity, and angular acceleration as function of time to illustrated the driving frequency. Phase diagrams can also be plotted using the software.
- Ensure all electronics are far away from the demo
Video:
source: https://play.library.utoronto.ca/watch/da59210a7794bccb205593756debbdca


